Posts

Showing posts from 2015

Smittybilt XRC Winch

Image
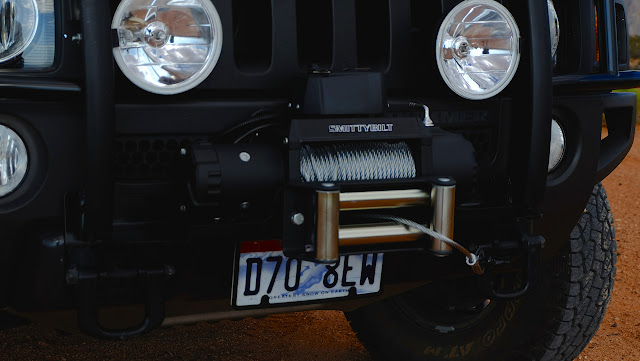
This has been awhile in coming, since our Three Hour Tour , in fact; a winch. Since then I've yet to be in a situation where we've needed planetary gears-not for lack of trying-we've just had better approach angles, more adept at articulating a fly-by-wire throttle, and more prudent lines where we overcame obstacles and terrain without even so much the Hi-Lift or the TREADs. But I keep going back to the Barracks trail, that night we spent, and even though we made it out at some aesthetic cost to the Montero, a winch would've made it a short trip. It's a Smittybilt 9500 lb. XRC standard winch and it's mounted on a MaxMate Grille Guard with a winch mount. I replaced the N-Fab Grille Guard, reluctantly - I was hoping to get an integrated mount fabricated that would fit behind the stock grille to preserve the approach angle, but to no avail. The swap adds another 120 pounds to the front end, retarding turn-in and adding a bit of mass to the tendency to overs

Seat Back Pack

Image
The H3's front seats have a small cargo stowage system on the back of each that serve little practical purpose and when packed just a smidgeon beyond their capacity, detach from the seat back and spill the contents in the rear footwell. It's the worst designed feature of the H3's interior. If you've been following this build you know I've gone through a couple of versions of creating an application using the seat back for better storage, but none to my satisfaction - either too much or not enough. This year for Fathers' Day my thoughtful kids gave me the Condor camera bag pictured above, a 9"x12"x8" padded bag with a front zipper pocket with a mesh pocket and sleeves. The photo gear I use tucks away into another bag fitted for another compartment, so I repurposed the Condor bag to hold foul weather gear and other items for our travels, and devised a way to attach it to the driver-side seat back. I had a duplicated order of a Yak Gear Kay

Auxiliary Lighting

Image
One of the earliest mods on the H3 was the installation of a pair of Hella 700ff lamps to the grille guard, and while they doubled my visibility off-road, I wanted more shine on the peripheral, and closer to eye-level. I also wanted illumination off the rear of the H3 for backing and working to set up camp in the dark of night, as well as work lights coming off the side of the vehicle. We do a lot of night travel in the Summer with daytime temps past the century mark.  I went with Hella 500ff lamps for the peripheral lighting, mounting them to the air-intake covers at the A-pillars. The air intakes are a composite of two layers, the painted shell and an inner layer that mounts to the frame. The lamps are mounted aft on the intakes with stainless steel washers underneath to reinforce stability.  On top, the lamps sit on white nylon bushings to protect the finish and provide friction in adjusting the fixtures. The bushing is surrounded by a black zip tie that binds the wiring

Bugout-Bag Retainer

Image
Stowage is hard to come by in the H3 when it's configured and packed for overlanding, making me evaluate any possible nook as a space to store gear. I keep a bug-out-bag (BOB) on board at all times and have been stuffing it under the dog deck making it difficult to retrieve in a hasty egress. Enter the passenger-side rear window well, a six inch deep, 11" x 22" (roughly) vertical space, coming close to the dimensions of my BOB. While obscuring this window appears to reduce blind-spot visibility, I found little visual loss from the driver position when checking through the rear passenger door window. Having kayaked for decades I thought to use a Bungee Deck Kit from Yak-Gear and adapt it to the periphery of the window well. The kit consists of six pad eyes and two J-hooks along with mounting hardware for a kayak deck. I replaced the hardware with 3/16" aluminum rivets with a 1/2 to 5/8 grip range. The kit also include ten feet of 1/4" bungee cord that I m

Rear Door Mod

Image
While the above modification worked well to keep essentials handy, it encroached too far into the cargo space, since the overland gear packs in filling the space completely while securing the load.  The Fiskars ax has been relocated across the driver-side cargo area storage compartment and the MOLLE panel has been moved up above the rear-door utility shelf.  Now the packs clear the load when the door is closed, yet they're still accessible. Rear Door Utility Shelf Mod  One of our favorite interior modifications on the Montero was the addition of a utility shelf that provided a place for food prep. The H3's rear door stows the jack and hardware assembly behind a removable plastic panel, a perfect place to adapt a shelf to the rear door access cover versus adding one like what was done on the Montero . Looking at clearances and how the panel is engineered to fit into the plastic surround I decided to use one-quarter inch oak veneer for the shelf and

ARB 4' Awning

Image
I had an Australian 60" Eezi Awn awning on the Montero that converted me to the idea, but not to the convenience since the Eezi Awn's cam system in the legs was unstable at best in calm conditions. This ARB awning solves that and other issues. Its engineering makes it easy to deploy by one person. The construction is top notch with reinforced corners on the awning and clever plastic disk stays on the struts and legs that keep all the hardware in place until it's deployed. Stowing is a cinch in its PVC reinforced nylon bag with two d-ring velcro straps and heavy duty weather-proof zippers.

Blue Ridge Overland Gear

Image
I'll admit it. Most my OCD is manifest in putting stuff in the right spot. The H3 is short of spots and in my quest to sort out its interior I came upon Blue Ridge Overland Gear . They're a company out of Virginia who make high quality MOLLE, hoop and loop, pouches and accessories for most any storage application in an adventure vehicle. Some of their stock is custom made to upgrade existing gear like fridges and store Goal Zero battery packs, and that's what caught my attention. I have neither, but I could see how I could adapt their products to my needs and get things where they belong. Blue Ridge makes an eight-inch headrest panel of loop material on the backside and a smooth, blank panel on the front. It creates a foundation to configure pouches for storage needs of items kept readily at hand. I added their Goal Zero 10 Battery Charger pouch to hold handheld two-way radios with their headsets, and a 4x8x1 Medium VELCRO front zip pouch to the headrest panel.