Interior Mods
Rear Door Utility Shelf Mod
One of our favorite interior modifications on the Montero was the addition of a utility shelf that provided a place for food rep. The H3's rear door stows the jack and hardware assembly behind a removable plastic panel, a perfect place to adapt a shelf to the rear door access cover versus adding one like what was done on the Montero.

One of our favorite interior modifications on the Montero was the addition of a utility shelf that provided a place for food rep. The H3's rear door stows the jack and hardware assembly behind a removable plastic panel, a perfect place to adapt a shelf to the rear door access cover versus adding one like what was done on the Montero.
Looking at clearances and how the panel is engineered to fit into the plastic surround I decided to use one-quarter inch oak veneer for the shelf and thought to hinge the panel to the surround.

I used a band saw to rough cut the outline of the oak shelf insert going back and forth to the door to test fit, rasp and sand until I was satisfied with the fit and clearance.

Once I had it fitted I stained it with MinWax Cherry stain, three coats, and after proper drying time shot it with Cabot's marine grade gloss spar varnish, five coats. It's far from perfect in finish and craft but it will do the job.

Next, I hung the panel to the surround using stainless steel marine hinges, the best alternative I could find that weathered well, looked better than hardware store fare, and adapted to the flare of the plastic surround. I used stainless 1/2 inch 10-24 hardware with locknuts. I then mounted the oak insert into the opening where it rest and closed the plastic panel over it and locked it down. I used some foam between the oak panel and the jack hardware to give the panel some resistance.
I drilled some pilot holes through the plastic panel for the top two fasteners, and then once it was installed drilled through those holes into the oak panel for alignment. I used stainless flathead one-inch 10-24 hardware with finishing washers on the oak side, with lock washers and thin nuts on the panel side finishing that with black plastic covers. With the two top fasteners installed, I measured, drilled and completed the bottom fasteners.


I wanted a simple way to suspend the assembly and level it out within reason of the H3's cant when parked. I decided to use black paracord that attached at d-rings that were riveted to the top of the panel and to the top of the opening.

In order for the panel to fold flush against its jamb, the paracord would have to detach, so I used a pair of small Nite-Ize s-clips for ease of attaching and detaching. They clip into a bowline knot at the end of the paracord, and to the d-ring.

The top is tied to the riveted d-ring just below the opening using a cow hitch that is tied off down the cord allowing an easily adjustable suspension of the shelf.


Safety
Having come close to rolling the Montero in a river and realizing that with its electric window lifts I'd be in deeper trouble if I or anyone else needed to exit the vehicle, I installed a glass hammer in the H3 in the event we'd ever have to evacuate it through its smaller windows. This fit nicely out of the way on the B pillar. The black bracket has a dayglow button on the left to help locate the hammer.

SeatBackPack
The H3's front seats have a small cargo stowage system on the back of each that serve little practical purpose and when packed just a smidgeon beyond their capacity, detach from the seat back and spill the contents in the rear footwell. It's the worst designed feature of the H3's interior.
I keep a bug-out-bag in the cargo area where it bounces around a bit when it's not restrained and takes up some of what little precious room is back there (the second worst designed feature).
Using a heavy duty snap fastener kit I designed a T-shape pattern that attaches the BOB to the seat back while allowing the padded pack straps to tuck between the pack and the seat back.

This H3 rarely has rear-seat passengers, but when it does the pack unsnaps easily from its mount and can be stowed in the back.
After installing the dog-deck (below) I needed to rethink the BOB. The back pack I was using was too big and encroaching, so I repurposed a storage bag for a duffle bag and came up with a more efficient use of space while still having it readily accessible in the truck and still be able to remove and stow it quickly in a larger ditch bag.


Dog Deck
Our dogs spend more time than any backseat passengers in the H3, as they did when we had the Montero. I did a rear-seat mod on it to make dog travel easier on all of us.

Having made a great improvement in traveling with the Goldens, as well as increasing storage capacity, I decided to do the same on the H3.
Rear-seat removal is straight forward, remove the bottoms from their easily accessible mounts, and then the backs. The 60/40 seat back is mounted on a sub-frame that keeps the backs aligned and rigid. With everything out, this is what's left.

I removed the seat-backs from the sub-frame and reinstalled it. There are two spring loaded doors integrated into the transition that kept debris from falling in between the seats and the cargo area. I though these might be nice to maintain an access to the underside of the platform.

I then made stanchions out of off-the-shelf fencing hardware from Lowe's, four of which were shaped to measure from the floor to just above the six-gallon water tanks that I'll be stowing beneath the deck.


Once I hammered them into the shape and length needed, I fastened them to the floor using the H3 hardware that held the seat-bottoms in place. I also determined to rotate the front stanchions 90 degrees to decrease forward flexing of the brace.


With everything lined up, I marked the mounting holes on the plywood and drilled them out.
I rounded the opposite edges on the deck and then covered it in gray interior carpeting, using Gorilla glue and a staple gun. I then installed the deck, bolting it onto the stanchions.


I'm going to add one additional stanchion at the front of the deck in the middle for more rigidity.

I ordered a 41X28 1" Safari Straps Cargo Net from Amazon and installed it. It's dimensions were just about perfect.

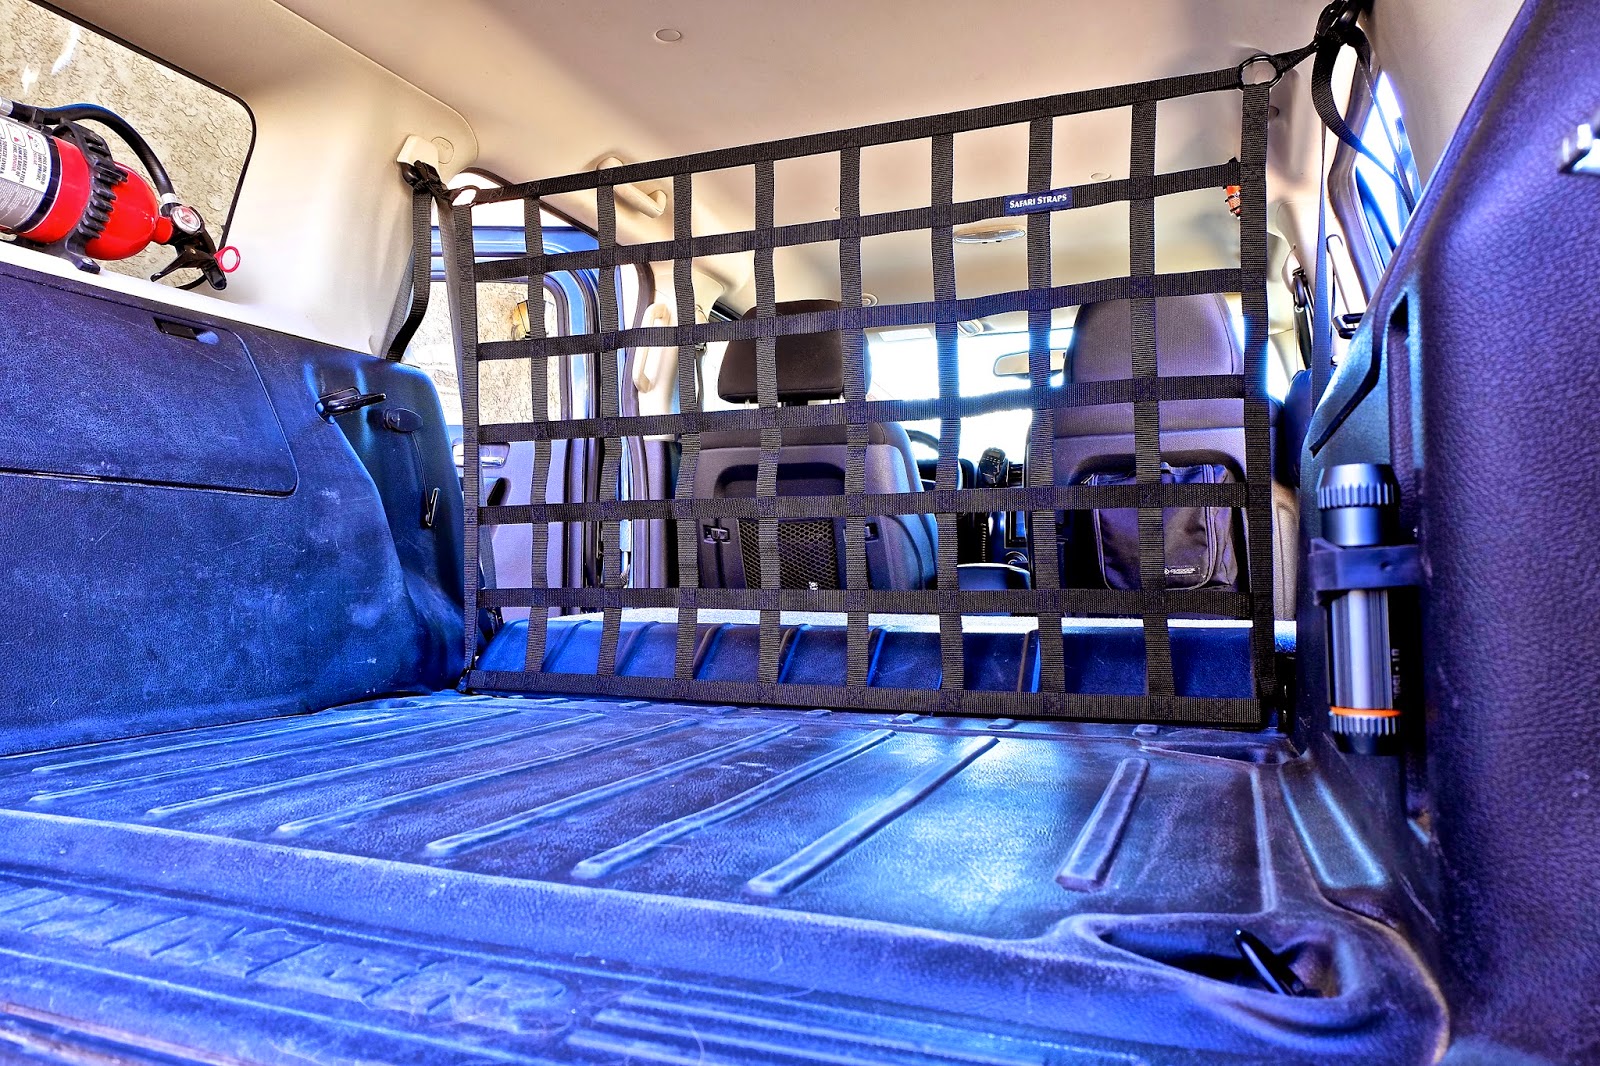


I attached the net to the seatbelt guides that are bolted on the C-pillars. The base of the net is attached to hardware loops that are welded on the sub-structure that I remounted.
The 60/40 split spring-loaded doors are still accessible for stowing smaller items.
The cargo net is stout in its construction and very secure in its mounting providing a safety barrier between the cargo area and the dog-deck.


